In this article, we explain how to use Remote Desktop software to access your Windows server from a Windows 10 PC or laptop.
Prerequisites
- PC or laptop with Windows 10
- Remote Desktop software installed (comes pre-installed with Windows 10)
- Windows VPS or Dedicated Server
Step 1: Open Remote Desktop Software
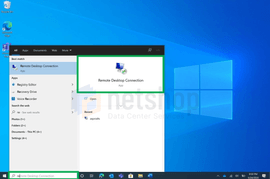
Click on the search bar in the left bottom of your Windows 10 screen and type Remote Desktop Connection in the search bar, as shown below.
Step 2: Enter Server’s Details
A new window will open (see screenshot below) where you will be prompted to enter your Server’s IP Address or Hostname (FQDN) and then click Connect.
If your Windows Server is missing an SSL Certificate or it has been installed with a self-signed certificate, a Warning will be displayed mentioning your Server’s Certificate cannot be validated. Click Yes to continue.
Congratulations! You have successfully connected on your Windows Server via RDP.
Alternative way to access your Windows Server
If you are a NetShop ISP Customer then you can manage your Cloud VPS or Dedicated Server from within the intuitive myNetShop Portal. In order to access your Server using our Web-based Console follow the simple steps below:
- Login to https://my.netshop-isp.com.cy
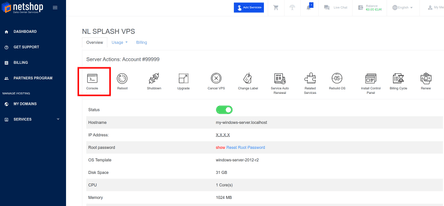
- Go to your server’s management page by clicking “Manage” from your Dashboard, or find your server from “Services” on the left-side menu.
- Click the “Console” icon from the top actions bar and a new popup window will open. Use your Server’s Credentials to login on your Server.


