


Your domain name gives a first impression to your users and as we all know, first impressions count. Whether you’re rebranding or just want more SEO friendly URLs, you may find yourself needing to change your WordPress domain name. If that’s the case, you want to make sure you do everything right to avoid causing any issues to your website.
The following process will allow you to successfully duplicate your WordPress site to use under a new domain name. Keep reading to follow our simple step by step guide on how to do it.
Changing your WordPress domain name
Before we get started, it’s important to stress that although the process is relatively simple, any small mistake could potentially disrupt the running of your WordPress site. Make sure you have a full backup of your website on your server before you get started with the following steps. If you’re unsure on how to do this, we’d advise contacting your web hosting provider.
Step 1. Add the new domain
1. Log in to cPanel.
2. Under Domains, click on Addon Domains.
3. In the New Domain area, enter your new domain name and a password. The other fields will be automatically filled out.
4. Click Add Domain.

Step 2. Copy files to the new domain
1. Open File Manager, under Files, in cPanel.
2. Open your website’s root directory, public_html.
3. Click Select All located at the top of the page.
4. Deselect the following files in public_html; cgi-bin, .qidb and addon domain directory.
5. In the top menu, click Copy and wait for a pop-up to appear.
6. In the pop-up, after /public_html type in another forward stroke (/) and then the new domain where you’re copying the files to.
7. Click Copy Files.

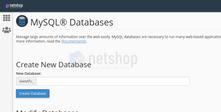
Step 3. Create a new MySQL database
1. In cPanel, under the Databases section, select MySQL Databases.
2. Under the Create New Database section, type in the name of the new database that you’re creating in the New Database field.
3. Click Create Database.
4. You’ll now be able to find and manage the new database that you created under Current Databases.

Step 4. Edit the wp-config.php File
1. Open File Manager under the Files section in cPanel.
2. Open the root folder, public_html, and locate wp-config.php.
3. Right click and select Edit.
4. The file will be opened in the File Manager editor, where you need to update your database settings with the ones that were created in step 3.
DB_NAME (Database name) – Replace database name with the new database name created in Step 3.
DB_USER (Database username) – Change username to the new username created in Step 3.
DB_PASSWORD (Database password) – Update password with the password created for your new database in Step 3.
5. Click Save Changes.
Step 5. Export MySQL Database
1. In cPanel, under the Database section, select phpMyAdmin.
2. In the phpMyAdmin window, select the database you wish to export from the left menu.
3. Click the Export tab on the top menu bar.
4. Under Export Method, the Quick option will already be selected for you. You do not need to change this.
5. Under Format, SQL will already be selected for you from the dropdown, you do not need to change this either.
6. Click Go at the bottom of the page.
7. You will be prompted to either open or save the .sql file. Click Save.

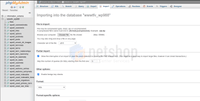
Step 6. Import MySQL Database
1. Again, select phpMyAdmin from the Database section of cPanel.
2. In the phpMyAdmin window, select the database you’ll be working with from the left menu.
3. Click the Import tab on the top menu bar.
4. Under File to import, click Choose File and select the .sql file previously saved in step 5.
5. Click Go at the bottom of the page to import the file.
6. Once the database has been successfully imported, a message will appear notifying you.
Step 7. Update Database settings
1. In cPanel, select phpMyAdmin under the Database heading.
2. From the left menu, click on the database that was created in step 6.
3. Now select wp_options.
4. Find the siteurl row (under option_name) and click the Edit button next to it (pencil icon).
5. Find option_value under Column and replace the existing URL with your new domain.

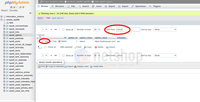
6. Click the Go button to save the changes.
7. Locate the home row and repeat the exact same steps (4-7).
8. Find the blog name row and select the pencil icon to edit.
9. Update the blog name and select Go.
10. Follow the same step for the blog description row too.
11. On the left menu select wp_users.
12. Locate the user_login row and click Edit.
13. Update the username with a new one of your choice.
14. Follow the same steps for the user_nicename row too.
15. Finally, locate the user_pass row to update your password. Delete the existing password and create a new one.
16. Select MD5 from the Variable Character Field and click Go.
By this point, you’ll now be able to log into your WordPress dashboard with your new URL followed by /wp-login.php and your new login details.
Step 8. Update remaining URLs
1. Login to your WordPress dashboard.
2. Find Plugins on the left menu.
3. Select Add New.
4. Search for a migration plugin to replace all existing URLs with the new URL. We recommend the free Better Search Replace plugin.
5. Click Install Now and then click Activate.
6. You can then find the plugin on the left menu under Tools to execute the search and replace.
Step 9. Check WordPress
1. In WordPress, select Settings from the left menu.
2. Click General.
3. Locate the WordPress Address and Site Address and ensure that both are your new domain name.
Voilà – you’ve changed your WordPress website domain name!
WordPress Web Hosting with NetShop ISP
Host your WordPress website with NetShop ISP and get cPanel completely free – making it a whole lot easier for you to maintain your website. Benefit from a free .com domain name and 24/7 customer support too.


![[Updated] Critical cPanel Authentication Vulnerability (28th April 2026) – Immediate Server Update Required](/_gatsby/image/9362bad24aca87aaa90e289c118b76b0/67251f60721abd86cb9f9501c2c68de8/netshopisp-cpanel-whm-vulnerability-april-2026.avif?u=https%3A%2F%2Fnsblg42.netshop-isp.com.cy%2Fwp-content%2Fuploads%2F2026%2F04%2Fnetshopisp-cpanel-whm-vulnerability-april-2026.png&a=w%3D256%26h%3D256%26fm%3Davif%26q%3D75&cd=7f5f10dc79af53379741259c5c02101d)

