


In this tutorial, we will show you how to extend an LVM disk on your Ubuntu 20.04 Server. Resizing disks is a common yet challenging task for system administrators, when servers are running out usable disk space or when the standard partitioning during installation does not fit their bespoke needs.
What is LVM?
LVM stands for Logical Volume Management. It is a system of managing logical volumes, or filesystems, that is much more advanced and flexible than the traditional method of partitioning a disk into one or more segments and formatting that partition with a filesystem (source: https://wiki.ubuntu.com/Lvm).
LVM consists of 3 main concepts:
- Physical Volume (PV) – this is the actual disk, i.e. /dev/sda, /dev/sdb, etc.
- Volume Group (VG) – physical volumes/disks are combined into volume groups, i.e. ubuntu-vg = /dev/sda + /dev/sdb
- Logical Volume (LV) – a volume group is divided into several Logical Volumes, i.e. ubuntu-vg/root , ubuntu-vg/home, etc.
Information about the PV, VG and LV are important in order to successfully resize our LVM disk.
Step 1. Collect information about current LVM settings and names
To find out the physical volumes (PV) used by the LVM file system, run this command:
sudo pvs
Now we need to find out the Volume group name. Do it by typing this command:
sudo vgdisplay
Next, we will issue the following command to find out information about the Logical Volume:
sudo lvdisplay
As per our example above, we need to make a note of the following useful information:
Our server has one Volume Group named “ubuntu-vg”, which has one Logical Volume “ubuntu-lv”. With this information, we can proceed to extend our disk.
Step 2. Create new Physical Volume (PV)
Whether your Ubuntu 20.04 is a Virtual machine or installed on a Bare-metal dedicated server, you will need to attach/insert the new disk (virtual or physical). Once you do this, we need to configure it within the existing LVM file system.
Type the following command to identify the new disk you have attached:
sudo fdisk -l

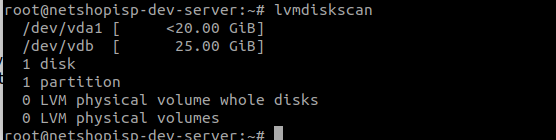
Our initial physical volume is named /dev/vda (20GiB) and our newly attached disk (25 GiB) is under the name /dev/vdb.
Another useful command to identify the LVM disk on your server is the following:
sudo lvmdiskscan
We are now good to go to create our new disk as Physical Volume on the server:
sudo pvcreate /dev/vdb
Output: Physical volume “/dev/vdb” successfully created.
Step 3. Add the new Physical Volume (PV) to our Existing Logical Volume (LV)
We will no add our new PV (/dev/vdb) to our existing logical volume. From the first commands in this tutorial, we have noted “ubuntu-lv” as the logical volume name, and “ubuntu-vg” as the volume group name.
Type the command:
sudo vgextend ubuntu-vg /dev/vdb
Output: Volume group “ubuntu-vg” successfully extended.
Now we need to extended the Logical volume as follows:
sudo lvm lvextend -l +100%FREE /dev/ubuntu-vg/ubuntu-lv
Your LVM Disk has now been successfully extended. One last command is needed so that the “df -h” output shows the correct size of your file system:
sudo resize2fs -p /dev/mapper/ubuntu--vg-ubuntu--lv
That’s all! We have demonstrated how you can easily extend the LVM file system on your Ubuntu 20.04 Server.