In this article we will demonstrate the steps you need to perform on your Almalinux 8 server to install MySQL 5.7.
Although the current stable version of MySQL is 8.0, we decided to publish this article anyway as there is an increased demand for installing MySQL 5.7 on new Linux distributions such as Almalinux 8.
Steps to Install MySQL 5.7 on AlmaLinux 8
Follow the next steps to complete successfully the installation of MySQL 5.7 (community edition) on your Almalinux 8 server.
Step 1. Update your system
root@localhost:~$ dnf update -yOnce the update completes, reboot your server as follows:
root@localhost:~$ shutdown -r nowStep 2 – Add the Enterprise Linux 7 Repository for MySQL 5.7
By default, AlmaLinux 8’s repository contains the MySQL 8.0 packages. Therefore, we need to add the EL7 repository in order to install MySQL 5.7. Copy the following command and paste it on your server’s terminal:
root@localhost:~$ tee /etc/yum.repos.d/mysql-community.repo<<EOF
[mysql57-community]
name=MySQL 5.7 Community Server
baseurl=http://repo.mysql.com/yum/mysql-5.7-community/el/7/\$basearch/
enabled=1
gpgcheck=0

[mysql-connectors-community]
name=MySQL Connectors Community
baseurl=http://repo.mysql.com/yum/mysql-connectors-community/el/7/\$basearch/
enabled=1
gpgcheck=0

[mysql-tools-community]
name=MySQL Tools Community
baseurl=http://repo.mysql.com/yum/mysql-tools-community/el/7/\$basearch/
enabled=1
gpgcheck=0
EOF
Once done, run the following commands to disable the default mysql AppStream modules:
root@localhost:~$ dnf remove @mysql
root@localhost:~$ dnf -y module reset mysql
root@localhost:~$ dnf -y module disable mysql
Step 3 – Install MySQL 5.7 on AlmaLinux 8
As we have completed preparing our environment for MySQL 5.7, we now proceed to the installation part.
Execute the following command to disable the MySQL 8.0 repo:
root@localhost:~$ dnf config-manager --disable mysql80-communityNow, enable the MySQL 5.7 repo:
root@localhost:~$ dnf config-manager --enable mysql57-communityFinally, let’s install MySQL 5.7 using the following command:
root@localhost:~$ dnf install mysql-community-server -yThat should do the job! To verify the success of your MySQL 5.7 installation, check the version by issuing the following command:
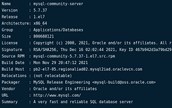
root@localhost:~$ rpm -qi mysql-community-serverSample Output:
It’s time to proceed with configuring MySQL 5.7 on the server in order to start using it properly.
Step 4 – Configure MySQL 5.7 on AlmaLinux 8 Server
Start the mysql service and enable it to auto-start on boot, using the following commands:
root@localhost:~$ systemctl start mysqld
root@localhost:~$ systemctl enable mysqld
Now, execute the following command to retrieve the temporary password for root, as generated using the installation process:
root@localhost:~$ grep 'A temporary password' /var/log/mysqld.log | tail -1A sample output will be this:
2022-01-19T23:03:58.688374Z 1 [Note] A temporary password is generated for root@localhost: 4*De@eF^9abGNow that we have the temporary root password, we proceed to the last configuration steps of MySQL 5.7.
root@localhost:~$ mysql_secure_installationYou will be asked to enter the current password (in our example that is 4*De@eF^9abG) and then you will be asked to set a new mysql root password.
Then, press “Y” when prompted as follows:
Do you wish to continue with the password provided?(Press y|Y for Yes, any other key for No) : Y
Remove anonymous users? (Press y|Y for Yes, any other key for No) : Y Disallow root login remotely? (Press y|Y for Yes, any other key for No) : Y Remove test database and access to it? (Press y|Y for Yes, any other key for No) : Y
Reload privilege tables now? (Press y|Y for Yes, any other key for No) : Y
Congratulations! Following the above simple steps we have demonstrated how to install MySQL 5.7 on AlmaLinux 8 server!


