


Remote Desktop Licensing is a critical role service in Windows Server 2019 and 2022 that manages and distributes Remote Desktop Services (RDS) Client Access Licenses (CALs) to users or devices connecting to a Remote Desktop Session Host.
RDS It ensures that organizations remain compliant with Microsoft licensing requirements while enabling secure, multi-user remote access to applications and desktops. Once activated and configured, the licensing server tracks the issued CALs and validates connections, making it an essential component of any production RDS deployment.
In this article we will go through the three basic steps a SysAdmin must do to install RDS and active CALs on Windows Server 2019/2022.
Step 1: Install Remote Desktop Services on Windows Server 2019/2022
Install the Remote Desktop services role on your Windows Server by following these steps:
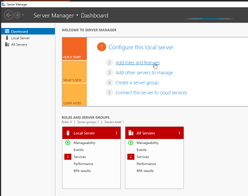
- From search bar, type Server manager and click the result to open the Server Manager dashboard.
- Once opened, click the Add roles and features link.

- A new window will appear; click Next on the “Before You Begin” page to continue.
- On the next page, select the Role-based or feature-based installation and click Next
- On the Server Selection page, select your desired server (i.e. the one you are currently connected to) and click Next
- On the Server Roles page, select the Remote Desktop Services and click Next


- Next, on the Features page click Next
- Click Next again on the Remote Desktop Services page that follows
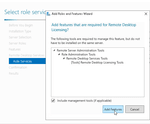
- On the Role Services page select Remote Desktop Licensing and Remote Desktop Session Host, then click Next and then click Add Features

- Continue by clicking Next and then click the Install button to begin the installation.


If reboot is needed please do so and then continue with the remaining of the steps below once the server is back online.
Step 2: Activate License Server
If the Remote Desktop Licensing role was successful, you may open the Remote Desktop Licensing Manager from the Server Manager Tools.
Alternatively, you can open Powershell and execute the following command:
PS C:\Users\Administrator> licmgr.exe- In Licensing Manager, right click your server name
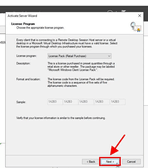
- Click Activate Server to open the Activation Wizard
- Choose your preferred activation method. This is usually the “Automatic connection (Internet)”
- Proceed to the next step by adding your details as requested (First name, Last name, Company, Country or Region) and click Next
- On the next screen, enter your company information and click Next
You have completed the licensing server activation! Let’s proceed now to install the RDS CAL licenses.
Step 3: Install RDS CALs
Right after the License server activation (Step 2) we are ready to proceed with installing the RDS CALs.
- In Licensing Manager, right click your server name
- Select Install Licenses
- Choose your license program type. If you are unsure, speak to your hosting provider or MSP from where you have retrieved the license/product key. For the sake of our example we will choose the License Pack (Retail Purchase) and then click Next

- Now enter the product key for your RDS CALs and click Next
- Assuming the product key entered is correct, you will see a window saying the Install Licenses Wizard has been completed successfully.
Congratulations! Your licensing server is ready to start issuing and managing licenses.
Free-of-charge Windows Server RDS Configuration for Premium SLA Customers
NetShop ISP customers subscribed to a Premium SLA plan are entitled to a discounted rate or even free-of-charge service for advanced configurations on Windows Servers.
Contact us today or speak to our Customer Care representatives for more information.


