


Changing the hostname of your WHM/cPanel server is a common task, whether you’re rebranding, migrating domains, or organizing your infrastructure. However, this change can cause unexpected issues, like expired or invalid SSL certificates for core services like Exim, Dovecot, FTP, and the WHM panel itself.
In this guide, we’ll walk you through how to fix SSL certificate renewal issues in WHM after a hostname change — using Let’s Encrypt SSL and AutoSSL to ensure a secure and trusted connection for both users and services.
Why SSL Certificates Break After Changing Hostname
When you install a Let’s Encrypt SSL certificate via WHM/cPanel, it’s bound to your server’s hostname (FQDN). If you later change this hostname, the certificate becomes invalid, and cPanel services like Webmail, WHM, and email (SMTP/IMAP/POP) start showing SSL certificate warnings or “expired certificate” errors.
You might also notice:
- Users see security warnings in browsers when accessing WHM.
- Mail clients (like Outlook or Thunderbird) reject SSL connections.
- Webmail or FTP throws SSL mismatch errors.
Step-by-Step Guide to Renew SSL After WHM Hostname Change
Step 1: Confirm the New Hostname is Set Correctly in WHM
Login to your WHM panel and navigate to:
WHM > Networking Setup > Change Hostname
- Enter your new FQDN hostname (e.g.
cpanel.example.com). - Make sure the domain resolves to your server IP.
- Click “Change” and wait for confirmation.


Step 2: Ensure DNS and Reverse DNS (PTR) Are Updated
Before issuing a new certificate:
- Confirm your new hostname has valid A and AAAA DNS records.
- Use a tool like https://dnschecker.org to verify.
- Set the correct PTR (reverse DNS) with your hosting provider.
Step 3: Reissue SSL Certificate for the New Hostname
From your WHM Control Panel navigate to:
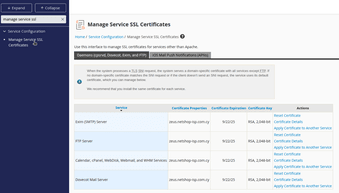
WHM > Manage Service SSL Certificates
This section manages SSL certs for:
- cPanel/WHM/Webmail
- Dovecot (IMAP/POP)
- Exim (SMTP)
- FTP
For each service:
- Click “Reset Certificate”
- Choose “Install the certificate for the current hostname”
- Click “Use the Hostname’s SSL Certificate”
This links the service SSL to the new Let’s Encrypt hostname cert.

Step 4: Run AutoSSL Manually
Even if the certificates were successfully installed, it’s highly recommended to force AutoSSL to validate and renew:
Run the following command via SSH:
root@whm:~$ /usr/local/cpanel/bin/autossl_check --forceThis forces WHM to:
- Renew SSL certificates
- Apply them to all services
- Revalidate the new hostname with Let’s Encrypt
Step 5: Restart Core Services to Apply New Certificates
To ensure all services load the new certificate, restart them via SSH:
root@whm:~$ /scripts/restartsrv_cpsrvd    # WHM/cPanel
root@whm:~$ /scripts/restartsrv_exim      # SMTP
root@whm:~$ /scripts/restartsrv_dovecot   # IMAP/POP
root@whm:~$ /scripts/restartsrv_ftpserver # FTP
Upon executing successfully the above commands, you may reboot the server (not required but it’s highly suggested).
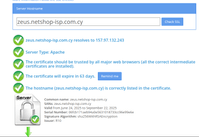
Step 6: Validate Renewed Let’s Encrypt SSL Certificate
In order to confirm your steps were successful, you may want to validate the renewed SSL via a trustworthy online tool such as https://www.sslshopper.com/ssl-checker.html.

Additionally, please make sure that you access your WHM control panel with https://<hostname>:2087 via an incognito browser, or by deleting cache/cookies on your existing one.
Deploy Cheap Dedicated Server Worldwide
Explore today our wide-range of dedicated servers available in multiple locations, or visit our Instant Servers page for configurations which are instantly available for provisioning.


