The .NET Framework 3.5 serves as a software development framework designed for building and running applications on Windows.
Most attempts to install .NET Framework 3.5 on a Windows Server 2019 fail because the server does not have the necessary source files. In this article we will provide a step-by-step guide for successfully installing .NET Framework 3.5 on your Windows Server 2019.
Common Use Cases of .NET Framework
The .NET framework is popular among the software developers and system administrators community for the following reasons:
- It helps developers integrating with many Microsoft technologies, including SQL Server, SharePoint, and Office.
- It’s compatible with a variety of programming languages and offers developers with a powerful stack of tools and libraries. Developers use the .NET framework to build mobile, desktop, web or server applications.
- The .NET Framework is popular as it’s free for everyone to use!
- System administrators and web developers can benefit from various features of .NET in order to increase the security, reliability and performance of the hosted applications.
Prerequisites
In order to follow this guide you will need:
- Windows 2019 OS installed
- Administrator privileged user
Steps to Install .NET Framework 3.5 on Windows Server 2019
Step 1
Download the Windows Server 2019 installation media (.iso) on your Server and then mount it by right-clicking the .iso file and clicking “Mount”.
Step 2
Navigate to the mounted ISO drive and Copy the \Sources\SxS folder to a directory on your Windows server. For the purpose of this tutorial we copied the folder to D:\Sources\SxS.
Step 3
Open Server Manager and from the top right menu click on Manage and then click on Add Roles and Features from the dropdown list.
Step 4
In the Add Roles and Features Wizard click on Installation Type and select Role-based or feature-based installation, then click Next.
Step 5
In Server Selection, select the destination server for installation. Usually this is your local server.
Step 6
Then click on Features, and select .NET Framework 3.5 (includes 2.0 and 3.0) under .NET Framework 3.5 Features.
Step 7
Click on confirmation and then click on Specify an alternate source path.
Step 8
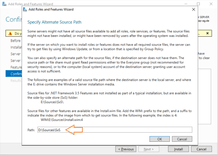
A new window will popup when you click “Specify Alternate Source Path” window. Insert the source path as shown below and then click ok.
Step 9
In the Confirm installation selections window, click Install.
Congratulations! You have successfully installed .NET 3.5 on Windows Server 2019.


