


Plesk is one of the most popular and powerful web hosting control panels available today, designed to simplify server and website management for system admins, developers, and hosting providers.
Whether you’re managing multiple domains, automating routine tasks, handling email accounts, or securing your infrastructure, Plesk provides an intuitive graphical interface to streamline these tasks.
In this guide, we’ll walk you through the complete process of installing the Plesk Control Panel on AlmaLinux 9 server using the CLI method.
Pre-requisites for Installing Plesk on Almalinux 9
Before you start with this tutorial, make sure of the following pre-requisites:
- Almalinux 9 server with access to public internet
- Root or sudo-level user on the server
Steps to Install Plesk on Almalinux 9
Plesk offers various installation methods for Linux servers – in this tutorial we will follow the CLI installation method.
Step 1 – Download and Run the Plesk installer
As soon as you connect on your server download the Plesk auto-installer:
root@localhost:~$ wget https://autoinstall.plesk.com/plesk-installerThen add the proper permissions to the downloaded file, as follows:
root@localhost:~$ chmod +x plesk-installerYou are now ready to run the installer and start the automated installation process. Run the installer as follows:
root@localhost:~$ ./plesk-installerOnce prompted choose the Go forward action by pressing the letter F.

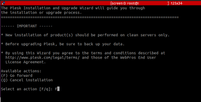
At some point you will be prompted to answer whether you would like to send information to Plesk for issues/errors occurred. You may choose Y or n. In our case, we pressed n for No.
Step 2 – Choose Installation type for Plesk Obsidian
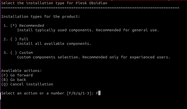
During the process, the Plesk installer will ask you whether to proceed with Recommended, Full or Custom installation.
You may choose to proceed with the Recommended option. Like before, press F to Go forward with the installation.

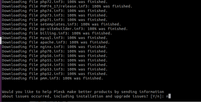
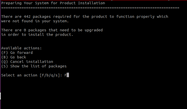
During the next steps, the Plesk installer will detect any outdated packages within your Almalinux server and ask for your approval to proceed with the update.
Press F to continue by updating all pending packages.
Step 3 – Create your Admin Credentials
Once the installation has been completed, an output similar to the screenshot below will appear.
How To Install
Plesk Control Panel
on Almalinux 9 (CLI)
You can then browse to the indicated URL (e.g. https://<IP ADDRESS>:8443 and then login using your server’s root username and password.
Once logged in you will be prompted to set a new password for user ‘admin’ as well as validate a Plesk commercial license or a free trial license.

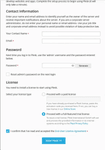
You should now see the following screen on your web browser.


You are all set! If you have followed the above steps, you have succeeded in installing Plesk control panel on your Almalinux 9 server using the CLI installation method.
Get Started with a Plesk Linux Server Today
At NetShop ISP we offer a wide-range of server hosting solutions that you can use to deploy Plesk control panel.
From VPS to Dedicated Servers available in our global infrastructure, you can get started with a low-cost configuration and then upgrade as your website’s traffic grows.
Should you need to speak with a Solutions representative for any questions or a tailor-made hosting solution, contact us today.


