


In this article we will demonstrate the exact steps you need to perform to allow remote connections to your SQL Server. This is useful if you want to execute queries from a remote computer or connect a remote web server to your SQL Instance.
Pre-requisites
- RDP is enabled on the Windows Server
- SQL Server (Express, Web, Standard or Enterprise) installed
- You have Administrator-level access on Windows Server
- You have at least one user created with Database Connect access on SQL Instance
Steps to Enable Remote Connections to SQL Server
Step 1: Configure SQL Server Management Studio for Remote Connections
1.1. Click Start and search for SQL Server Management Studio
1.2. Connect to your SQL server instance
1.3. From the left navigation menu, right-click the server name and click Properties
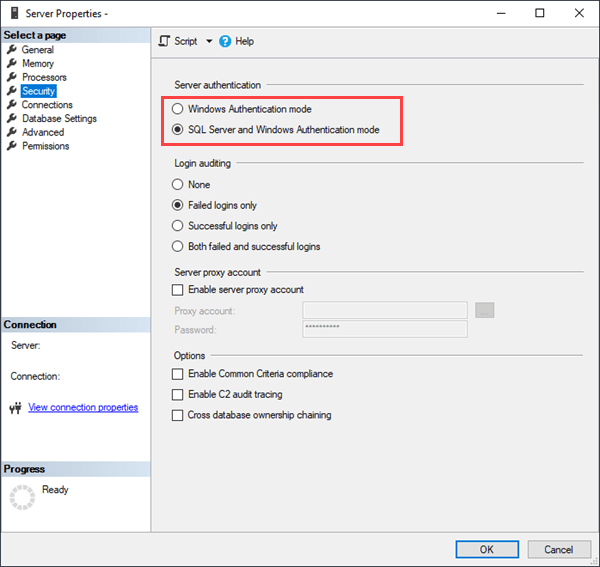
1.4. Go to the Security page for Server Authentication, and select SQL Server and Windows Authentication mode
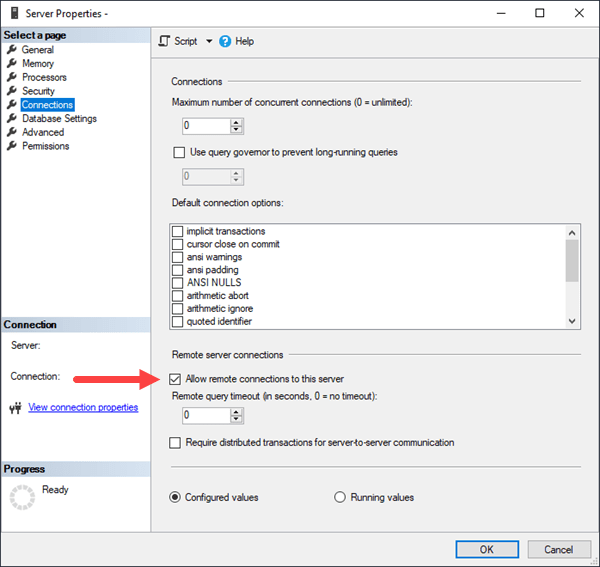
1.5. Go to the Connections page and tick/enable Allow remote connections to this server. Then click OK
Since we have completed all steps to enable remote connections to the SQL Server, last thing we need to do is to ensure that the Windows Firewall (if enabled) can accept the incoming connections to the server.
Step 2: Configure Windows Firewall for SQL Server Remote Connections
2.1. Click Start and search for Windows Defender Firewall with Advanced Security
2.2. Click on Inbound rules
2.3. Click New Rule from the Actions menu (right side)
2.4. Select Port and click Next
2.5. Select TCP and then enter the Specific Port which is for MSSQL Server: 1433
2.6. Action: Select Allow the Connection and click Next
2.7. Enter a name for this new rule and click Finish
At this point we need to create one more Inbound rule as follows:
2.8. Click on Inbound Rules and then click New Rule
2.9. Select Custom and click Next.
2.10. Click the Customize button from the Services section
2.11. Select Apply to this service and select your SQL Server. Then click OK.
2.12. Continue by clicking Next all the way through. Finally, create a Name of this New Rule. Then click Finish
Step 3: Configure TCP/IP in SQL Server Configuration Manager
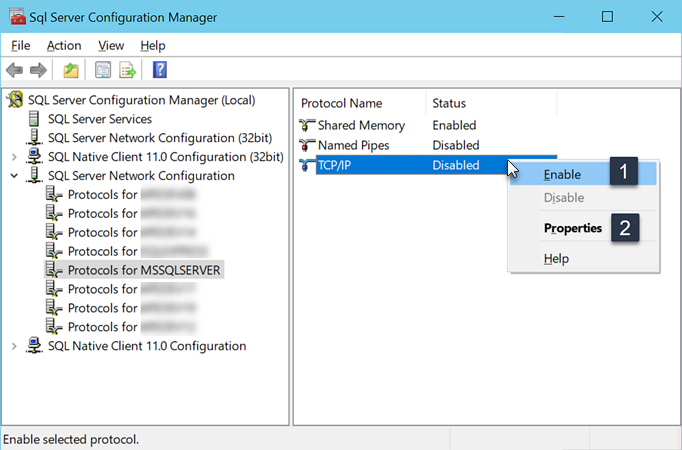
3.1. Go to Start and search for SQL Server Configuration Manager
3.2. Expand SQL Server Network Configuration and Protocols for your Server (you will see your server’s name there).
3.3. Right-click TCP/IP and select Enable.
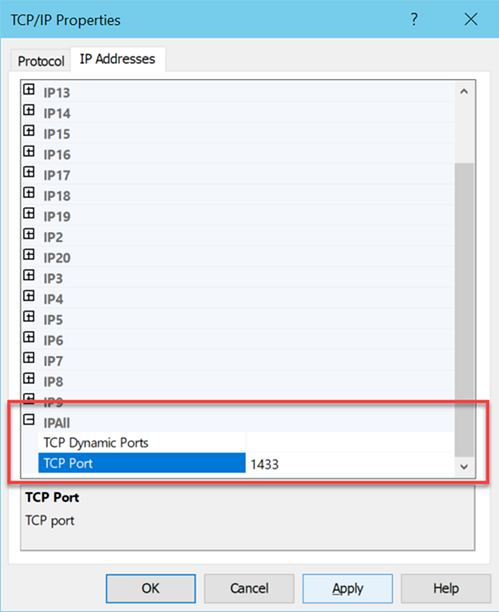
3.4. Right-click TCP/IP again and select Properties. View the IP Addresses tab and locate IPAll
3.5. Enter the value 1433 directly in the TCP Port field and click OK to apply the change
3.6. Finally, you need to restart your SQL Server for the above change to take effect. From the SQL Server Services dialog, right-click on your server name and click Restart

Get peace of mind with Managed SQL Server Hosting
Managed SQL Hosting is a value-added service offered by NetShop ISP where we take care of everything related to your SQL Database(s); from initial SQL Server installation, fine-tuning for best performance, on-going administration and 24×7 pro-active monitoring.
Contact us today to arrange a 1:1 consultation by one of our SQL Server specialists.