


Acronis is a world-leading technology company providing backup software and data protection solutions for business and individuals.
Three of the main advantages Acronis Cloud backup offers are:
- Enhanced Data Protection with real-time malware scanning and flexible data backup scheduling.
- Rapid Data Recovery with options to download backups or restore to a different machine (dedicated or virtual server)
- AI-powered anti-ransomware protection and blockchain notarization to ensure highly-secured storage of data.
Installation of Acronis backup agent on a Linux server is relatively easy, considering you have root or a sudo account on the server and, of course, access to the Acronis Control panel. In this article we outline the general steps to install the Acronis Backup agent on a Linux server.
System Requirements
- Up-to-date kernel on your Linux server. To update the kernel, execute the following commands in bold:
# yum update kernel [CentOS/Redhat]
# apt-get dist-upgrade [Ubuntu/Debian] - Make sure ‘gcc’ and ‘make’ are installed on the server. On CentOS/Redhat servers these are installed by default. If you are on a Debian/Ubuntu server, execute the commands below in bold:
# apt install gcc
# apt install make
# apt install make-guile
Let’s Start to Install Acronis Backup Agent on a Linux Server
- Login to myNetShop Portal (https://my.netshop-isp.com.cy) and navigate to the Cloud Backup service management page.
- Click the blue button “Click here to access Control Panel”
- Login to your Acronis Cloud portal (credentials can be retrieved from Step 2)
- Click “Add Device”
- Click the Linux logo
- The acronis agent will start downloading. Navigate to your browser’s downloads folder and copy the download source link
- SSH to your Linux server
- Use the download link you copied from step 7 to download the Acronis agent on your server. If it doesn’t work, please execute the following command in bold:
# wget https://eu-cloud.acronis.com/download/u/baas/4.0/15.0.29958/CyberProtect_AgentForLinux_x86_64.bin - Execute the following command in bold to make the downloaded binary executable:
# chmod +x Cyber_Protection_Agent_for_Linux_x86_64.bin - Run the installer file by executing this command in bold:
# ./Cyber_Protection_Agent_for_Linux_x86_64.bin - From under Component Selection, select “Agent for Linux” and then click on “Next”.
A prompt notifying that some of the required packages are not being installed will be shown. Click on “Continue” to automatically install the packages.
Once the installation is completed, a prompt to register the machine will be displayed. Click on “Show registration info” button.
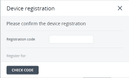
Once the Show Registration info button is clicked, a new message window will open with the Registration link and Registration code.


- Open the Registration link in a browser, log in to your Acronis account and enter the Registration code. Click on “Check Code“

Once the registration has been completed successfully, the agent installation console will also show a message that the agent installation has been completed successfully.
The server in which the agent has been installed will now show up inside the Acronis portal under All devices.


NetShop ISP offers cloud and dedicated servers through a privately-owned infrastructure in data centers worldwide and is an official Acronis Service Provider in Cyprus and Malta.


