As a managed hosting provider, NetShop ISP offers Managed Firewall service for customers who utilize pfSense for Network routing, VPN, Firewall management and Traffic monitoring needs.
One of the most frequent requests we receive is to provide OpenVPN accounts to a company’s employees with a static/dedicated IP address on one or more VPN accounts.
The documentation found online is quite poor for this particular implementation as it involves in-depth knowledge and expertise on both the OpenVPN and pfSense services.
In this article we will explain in clear, easy steps how you can assign multiple IP address in pfSense and assign them to one or more OpenVPN accounts.
The pfSense version used in this article’s example is 2.5.0-RELEASE (amd64) and we tested it on one a UK VPS server.
Prerequisites
- pfSense on a Virtual or Dedicated Server (Related article: How To Install PFSense Firewall)
- OpenVPN service (Related article by Chris Lazari: How To Setup OpenVPN on pfSense)
- 2 or more IPv4 addresses available to be used on the Server
Let’s get to work now.
Steps to Assign Multiple IPs in OpenVPN Accounts
Step 1: Add Virtual IPs
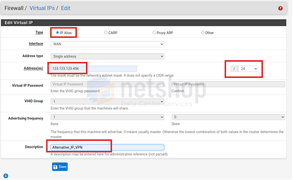
Assuming your Server has been assigned with multiple IPs, the first step is to add them as Virtual IPs from the pfSense GUI.
From the top menu click Firewall > Virtual IPs and then click the green “Add” button.
In the next page, please follow the same settings as shown in the screenshot below. The IP address is one of the additional IPs assigned on your server which you will eventually want to assign in a specific OpenVPN account.
When done, press Save at the bottom of the page.
The new Virtual IP has been added. Now proceed to Apply the Changes.
Step 2 – Create OpenVPN User
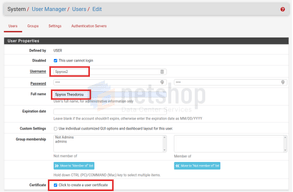
At this point we will create a new user for whom, later in this tutorial, we will assign a dedicated IP address.
From the top menu click System > User Manager and then click the “Add” button
The important setting when creating a new user, is the Certificate option. Check the box to ensure the new user will be associated with a dedicated Certificate on server-side.
Step 3 – Assign Static Local IP (Tunnel Network)
Upon creating successfully a new User (Step 2) we must now assign a static Tunnel Network IP. We assume you have already created the tunnel network when installing the OpenVPN Service. In our example, the tunnel network is 10.101.1.0/24.
To proceed with the local IP assignment, navigate to VPN > OpenVPN
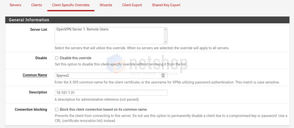
From the tabs click “Client Specific Overrides” and then click the “Add” button.
The Common Name must match exactly the username of the respective user. Then, as a good practice, add the tunnel network IP in the description field so you can quickly identify the IPs assigned to each user.
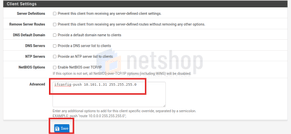
Under the Client Settings / Advanced section, add the command ifconfig-push 10.101.1.31 255.255.255.0. Remember that in this example we are using the IP 10.101.1.31 for our new OpenVPN user Spyros2.
Step 4 – Setup 1:1 NAT Rule
So far, we have created the OpenVPN Account for our user and assigned a static IP address for the tunnel network. Now it’s time to setup a 1:1 NAT rule for the tunnel’s local IP address translation into one of our public IP Addresses.
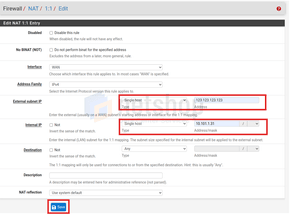
From the top menu go to Firewall > NAT
Click the 1:1 tab and then click the “Add’ button
Add the Public IP address (the one you have added as Virtual IP in Step 1) as the External subnet IP.
Then, under the Internal IP field add the Tunnel Network IP used in Client Overrides in Step 3. Then press Save.
We are done with assigning a static IP address to the OpenVPN user! Now you can export the OpenVPN certificate for your user who can start browsing the Internet using the newly assigned Public IP address.
Facing Issues? Opt for a Fully Managed Firewall
NetShop ISP offers Virtual and Hardware Firewalls based on pfSense. Moreover you may opt for a Fully Managed Firewall service so you can focus on your core business while we take care of the following aspects of your Firewall:
- pfSense Setup
- Public and Private Network Configuration
- High-Availability and pfSense Failover Setup (CARP)
- Additional Services Installation (OpenVPN, Squid, etc)
- Security Hardening
- Network Administration
- pfSense Backup Management


