


In this article, we will demonstrate the easiest way to install and configure MySQL 8 on Windows Server 2022.
For the purposes of this tutorial, we have used the Community Edition (CE) of MySQL and we installed it on UK DUAL VPS Server (2 Cores, 2 GB RAM, 60 GB SSD).
Pre-requisites
- Windows Server 2022 with internet access
- Administrator-level account
Steps to Install MySQL 8 on Windows Server 2022
Step 1 – Download MySQL CE
The first step is to download MySQL 8 Community Edition on our Windows Server. The CE edition is free and available for both 32-bit (x86) and 64-bit (x64) operating systems.
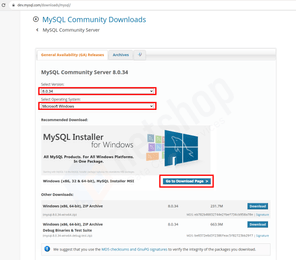
- Navigate to https://dev.mysql.com/downloads/mysql
- Select MySQL version
- Select “Microsoft Windows” as your Operating System
- Click the Go to Download Page > button
- Click Download next to your desired MSI installer version. Please note that the MySQL installer for Windows is 32-bit only.


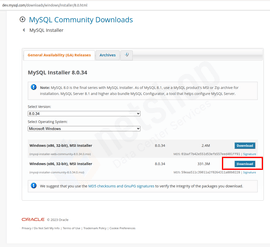
As soon as you click Download you will be redirected to a new page asking you to Login or Signup. Skip both options and click the link “No thanks, just start my download”.
Step 2 – Install MySQL CE on your Windows Server
Run the MySQL installer file you have just downloaded to begin the installation of MySQL 8. Read and then accept the agreement that is displayed on the Installer Wizard.
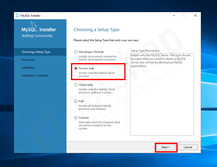
Then, you will be asked to choose Server Type. Choose “Server only” and click “Next“.

On the next screen, click the “Execute” button to begin the installation process.


The installer will install all the necessary components required for MySQL 8 to run on your Windows Server. Once all components are installed click “Next >” to proceed to the MySQL configuration wizard.

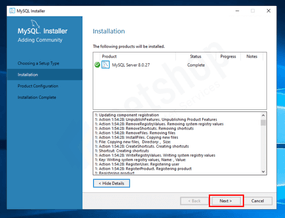
The installation part of MySQL 8 has been completed. Now let’s move on the configuration part.
How To Configure MySQL 8 on Windows Server 2022
Thanks to the graphical interface that Windows Server offer, configuring MySQL is very easy. In all screenshots below we have highlighted in a red rectangle all those settings which are required for MySQL to run properly. If you are a beginner, we advise that you keep those as you see them in our screenshots. Advanced users can adjust those as desired.
Once you have clicked Next from previous step, you will be taken to the “Type and Networking” step as shown below.

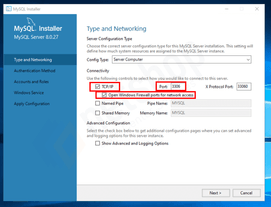
Choose “Server Computer” as the Config Type if you are planning to have other software and services running on the same Windows Server. You can also choose “Dedicated Machine” if your server will be used exclusively for MySQL.
Hit the Next button to proceed.

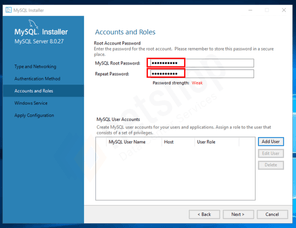
Enter a strong password for your MySQL Root account. Note it down somewhere securely as you will need it later on to connect via Command line or MySQL Workbench.
Then hit the Next button to proceed to the configuration of MySQL as Windows service.

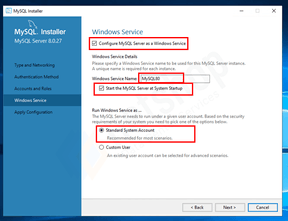
The settings used in the screenshot above are the recommended ones. Once again, if you are an advanced user you may want to change these according to your preferences.
Click Next to apply the configuration of previous steps, and then click Finish.


Congratulations! You have successfully installed MySQL 8 on your Windows Server 2022!


